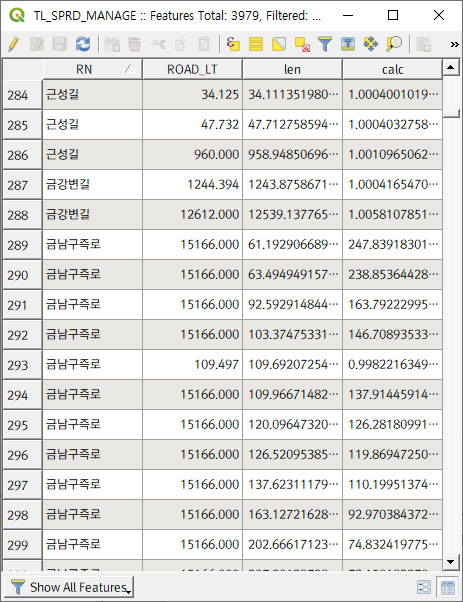
[GoF] Composite 패턴

패턴명칭

Composite

필요한 상황

배열이나 리스트 등과 같은 컨테이너와 컨테이너를 구성하는 구성 요소를 동일하게 처리하기 위한 패턴이다. 컨테이너와 구성 요소는 동일하게 처리되므로 컨테이너 안에는 또 다른 컨테이너를 포함할 수 있다.

예제 코드

우리가 흔히 접하는 폴더와 파일 개념이다. 폴더와 파일을 동일한 개념으로 다루기 위해 Unit이라는 추상 클래스를 두고, 폴더와 파일은 이 Unit을 상속받아 처리한다. Folder 클래스는 다시 여러개의 폴더와 파일을 담을 수 있으므로 Unit을 여러개 담을 수 있도록 한다. 먼저 Unit 클래스는 다음과 같다.

package tstThread;

public abstract class Unit {
	private String name;
	
	public Unit(String name) {
		this.name = name;
	}
	
	public String getName() {
		return name;
	}
	
	public String toString() {
		return name + "(" + getSize() + ")";
	}
	
	public abstract int getSize();
}

이 Unit 클래스를 상속받는 File 클래스는 다음과 같다.

package tstThread;

public class File extends Unit {
	private int size;
	
	public File(String name, int size) {
		super(name);
		this.size = size;
	}

	@Override
	public int getSize() {
		return size;
	}
}

Folder 클래스는 다음과 같다.

package tstThread;

import java.util.Iterator;
import java.util.LinkedList;

public class Folder extends Unit {
	private LinkedList<Unit> units = new LinkedList<Unit>();

	public Folder(String name) {
		super(name);
	}

	@Override
	public int getSize() {
		int size = 0;
		Iterator<Unit> it = units.iterator();
		
		while(it.hasNext()) {
			Unit unit = it.next();
			size += unit.getSize();
		}
		
		return size;
	}

	public boolean add(Unit unit) {
		units.add(unit);
		return true;
	}
	
	private void list(String indent, Unit unit) {
		if(unit instanceof File) {
			System.out.println(indent + unit);
		} else {
			Folder dir = (Folder)unit;
			Iterator<Unit> it = dir.units.iterator();
			System.out.println(indent + "+" + unit);
			while(it.hasNext()) {
				list(indent + "    ", it.next());
			}			
		}
	}
	
	public void list() {
		list("", this);
	}
}

이 클래스들을 사용하는 코드는 다음과 같다.

package tstThread;

public class Main {
	public static void main(String[] args) {
		Folder root = new Folder("root");
		root.add(new File("a.txt", 1000));
		root.add(new File("b.txt", 2000));
		
		Folder sub1 = new Folder("sub1");
		root.add(sub1);
		
		sub1.add(new File("sa.txt", 100));
		sub1.add(new File("sb.txt", 4000));
		
		Folder sub2 = new Folder("sub2");
		root.add(sub2);
		
		sub2.add(new File("SA.txt", 250));
		sub2.add(new File("SB.txt", 340));
		
		root.list();
	}
}

위 코드의 실행 결과는 다음과 같다.

+root(7690)
    a.txt(1000)
    b.txt(2000)
    +sub1(4100)
        sa.txt(100)
        sb.txt(4000)
    +sub2(590)
        SA.txt(250)
        SB.txt(340)

Composite 패턴은 집합과 그 구성요소를 동일하게 처리하기 위해 재귀적인 처리가 필수이다.

이 글은 소프트웨어 설계의 기반이 되는 GoF의 디자인패턴에 대한 강의자료입니다. 완전한 실습을 위해 이 글에서 소개하는 클래스 다이어그램과 예제 코드는 완전하게 실행되도록 제공되지만, 상대적으로 예제 코드와 관련된 설명이 함축적으로 제공되고 있습니다. 이 글에 대해 궁금한 점이 있으면 댓글을 통해 남겨주시기 바랍니다.

[GoF] Flyweight 패턴

패턴명칭

Flyweight

필요한 상황

동일한 객체를 자주 생성해서 사용할때, 매번 다시 생성하지 않고 객체풀(Object Pool)에 저장해 놓고 재활용하는 패턴이다. 메모리 절약과 객체 생성시 소요되는 시간을 줄여 퍼포먼스를 향상시킬 수 있다.

예제 코드

Digit는 0부터 9까지의 숫자를 8×8 도트문자로 화면에 표시하기 위해 아래와 같은 파일(digits.txt)로부터 데이터를 읽어들인다.

0
  ###   
 #   #  
 #   #  
 #   #  
 #   #  
 #   #  
 #   #  
  ###   
1
   #    
  ##    
   #    
   #    
   #    
   #    
   #    
  ###    
2
  ###   
 #   #  
     #  
     #  
    #   
   #    
  #     
 #####  
3
  ###   
 #   #  
     #  
   ##   
     #  
     #  
 #   #  
  ###    
4
     #  
    ##  
   # #  
  #  #  
 #   #  
 #####  
     #  
     #  
5
 #####  
 #      
 #      
 ####   
     #  
     #  
 #   #  
  ###   
6
  ###   
 #   #  
 #      
 ####   
 #   #  
 #   #  
 #   #  
  ###   
7
 #####  
     #  
     #  
    #   
   #    
  #     
  #     
  #     
8
  ###   
 #   #  
 #   #  
  ###   
 #   #  
 #   #  
 #   #  
  ###    
9
  ###   
 #   #  
 #   #  
 #   #  
  ####  
     #  
 #   #  
  ###   

Digit 클래스는 다음과 같다.

package tstThread;

import java.io.BufferedReader;
import java.io.FileReader;
import java.io.IOException;
import java.util.ArrayList;

public class Digit {
	private ArrayList<String> data = new ArrayList<String>();
	
	public Digit(int n) {		
		FileReader fr = null;
		BufferedReader br = null;
		try {
			fr = new FileReader("./digits.txt");
			br = new BufferedReader(fr);
			
			int nLine = 0;
			while((br.readLine()) != null) {
				if(n*9 == nLine) {
					for(int i=0; i<8; i++) {
						data.add(br.readLine());
					}
					break;
				}
				
				nLine++;
			}
		} catch(IOException e) {
			e.printStackTrace();
		} finally {
			try {
				if(fr != null) fr.close();
				if(br != null) br.close();
			} catch (IOException e) {
				e.printStackTrace();
			}
		}
	}
	
	public void print(int x, int y) {
		for(int i=0; i<8; i++) {
			String line = data.get(i);
			System.out.print(String.format("%c[%d;%df",0x1B,y+i,x));
			System.out.print(line);
		}

	}
}

DigitFactory 클래스는 Digit 객체를 생성하며, 한번 생성된 번호의 Digit 객체는 메모리 풀에 저장해두고 재활용한다. 메모리 풀은 HashMap을 사용했다. 코드는 아래와 같다.

package tstThread;

import java.util.HashMap;

public class DigitFactory {
	private HashMap<Integer, Digit> pool = new HashMap<Integer, Digit>();

	public Digit getDigit(int n) {
		if(pool.containsKey(n)) {
			return pool.get(n);
		} else {
			Digit digit = new Digit(n);
			pool.put(n, digit);
			return digit;
		}
	}
}

Number는 여러 개의 Digit로 구성된 정수값이, Number를 구성하는 Digit 객체는 Number의 생성자에서 DigitFactory 클래스를 이용해 생성한다.

package tstThread;

import java.util.ArrayList;

public class Number {
	private ArrayList<Digit> digits = new ArrayList<Digit>();
	
	public Number(int number) {
		DigitFactory digitFactory = new DigitFactory();
		
		String strNum = Integer.toString(number);
		int len = strNum.length();
		
		for(int i=0; i<len; i++) {
			int n = Character.getNumericValue(strNum.charAt(i));
			Digit digit = digitFactory.getDigit(n);
			digits.add(digit);
		}
	}
	
	public void print(int x, int y) {
		int cntDigits = digits.size();
		for(int i=0; i<cntDigits; i++) {
			Digit digit = digits.get(i);
			digit.print(x+(i*8), y);
		}		
	}
}

이 클래스들의 사용은 다음과 같다.

package tstThread;

public class Main {
	public static void main(String[] args) {
		Number number = new Number(77063);
		number.print(20, 7);
		
		System.out.println();
		System.out.println();
		System.out.println();
	}
}

실행결과는 다음과 같다.

이 글은 소프트웨어 설계의 기반이 되는 GoF의 디자인패턴에 대한 강의자료입니다. 완전한 실습을 위해 이 글에서 소개하는 클래스 다이어그램과 예제 코드는 완전하게 실행되도록 제공되지만, 상대적으로 예제 코드와 관련된 설명이 함축적으로 제공되고 있습니다. 이 글에 대해 궁금한 점이 있으면 댓글을 통해 남겨주시기 바랍니다.

[GoF] Adapter 패턴

패턴명칭

Adapter

필요한 상황

이미 만들어져 제공되는 클래스 또는 API가 수정할 수 없거나 수정이 불가능한 경우, 해당 클래스 또는 API를 다른 클래스의 타입 또는 다른 API로 사용해야만 할때 사용할 수 있는 패턴이다.

예제 코드

위의 클래스다어그램에서 SamsungScanner는 컴파일된 바이너리 형태의 라이브러리로만 제공된다고 하자. 이 SamsungScanner API를 이용하여 삼성 스캐너를 제어한다. 소스코드는 제공되지 않으나 API를 소스코드 형태의 문서로 확인해보자. 소스코드는 존재하지 않으나, 실습을 전제로 융통성을 발휘하기 바란다.

package tstThread;

public class SamsungScanner {
	public boolean ____initialize() {
		System.out.println("SAMSUNG SCANNER DRIVER LOADED");
		return true;
	}
	
	public boolean ____startScanning() {
		System.out.println("START SCANNING");
		
		try {
			Thread.sleep(1000);
			System.out.println("END SCANNING");
		} catch (InterruptedException e) {
			e.printStackTrace();
		}
				
		return true;
	}
	
	public boolean ____cancelScanning() {
		System.out.println("CANCEL SCANNING");
		return true;
	}
	
	public boolean ____release() {
		System.out.println("FREE ALL RESOURCES FOR SAMSUNG SCANNER DRIVER");
		return true;
	}
}

모든 스캐너 장치에 대해서, 스캐너를 이용하기 위해 필요한 인터페이스는 다음과 같다.

package tstThread;

public interface IScanner {
	boolean setup();
	boolean start();
	boolean cancel();
	void release();
}

SamsungScanner API를 IScanner API에 맞춰 사용할 수 있도록 ScannerAdapter 클래스를 추가했으며, 다음과 같다.

package tstThread;

public class ScannerAdapter implements IScanner {
	private SamsungScanner scanner;
	public ScannerAdapter(SamsungScanner scanner) {
		this.scanner = scanner;
	}
	
	@Override
	public boolean setup() {
		return scanner.____initialize();
	}

	@Override
	public boolean start() {
		return scanner.____startScanning();
	}

	@Override
	public boolean cancel() {
		return scanner.____cancelScanning();
	}

	@Override
	public void release() {
		scanner.____release();
	}

}

이 클래스들을 사용하는 User 클래스는 다음과 같다.

package tstThread;

public class User {
	public static void main(String[] args) {
		IScanner scanner = new ScannerAdapter(new SamsungScanner());
		
		if(scanner.setup()) {
			scanner.start();
			scanner.release();
		}
	}
}

실행결과는 다음과 같다.

SAMSUNG SCANNER DRIVER LOADED
START SCANNING
END SCANNING
FREE ALL RESOURCES FOR SAMSUNG SCANNER DRIVER

수정할 수 없는 API인 SamsungScanner를 원하는 형태의 API인 IScanner로 사용할 수 있는 Adapter로써 ScannerAdapter를 새롭게 정의하여 SamsungScanner의 API를 성공적으로 사용하고 있다.

이 글은 소프트웨어 설계의 기반이 되는 GoF의 디자인패턴에 대한 강의자료입니다. 완전한 실습을 위해 이 글에서 소개하는 클래스 다이어그램과 예제 코드는 완전하게 실행되도록 제공되지만, 상대적으로 예제 코드와 관련된 설명이 함축적으로 제공되고 있습니다. 이 글에 대해 궁금한 점이 있으면 댓글을 통해 남겨주시기 바랍니다.

[GoF] Bridge 패턴

패턴명칭

Bridge

필요한 상황

어떤 처리에 대한 큰 로직을 상황에 따라 다르게 정의해 실행해야한다. 이와 동시에 해당 로직을 구성하는 세부 항목에 대한 처리들 역시 다르게 정의하고자할때 사용할 수 있는 패턴이다. 즉, 구현의 차원이 2개 이상일때 이를 효과적으로 분리할 수 있는 패턴이다.

예제 코드

위의 예제는 Article 클래스에 정의된 데이터를 화면에 출력할때, 출력에 대한 구현을 Bridge 패턴을 이용해 구현하도록 설계한 클래스다이어그램이다. 먼저 Article 클래스는 다음과 같다.

package tstThread;

import java.util.ArrayList;

public class Article {
    private String title;
    private ArrayList<String> content;
    private String footer;
    
    public Article(String title, ArrayList<String> content, String footer) {
        this.title = title;
        this.content = content;
        this.footer = footer;
    }
    
    public String getTitle() {
        return title;
    }
    
    public ArrayList<String> getContent() {
        return content;
    }
    
    public String getFooter() {
        return this.footer;
    }
}

제목과 내용 그리고 꽁지글이 각각 title, content, footer 필드에 저장된다. 이 세개를 출력하는 방식은 IDisplay 인터페이스로 정의되며 다음과 같다.

package tstThread;

public interface IDisplay {
    void title(Article article);
    void content(Article article);
    void footer(Article article);
}

이 인터페이스를 구현하는 클래스는 모두 3개로 먼저 SimpleDisplay는 다음과 같다.

package tstThread;

import java.util.ArrayList;

public class SimpleDisplay implements IDisplay {
	@Override
    public void title(Article article) {
        System.out.println(article.getTitle());
    }

	@Override
    public void content(Article article) {
        ArrayList<String> content = article.getContent();
        int cntLines = content.size();
        for(int i=0; i<cntLines; i++) {
            System.out.println(content.get(i));
        }
    }

	@Override
    public void footer(Article article) {
        System.out.println(article.getFooter());
    }
}

ContentReverseDisplay 클래스는 Article의 content를 구성하는 문자열 요소를 역순으로 출력하며 다음과 같다.

package tstThread;

import java.util.ArrayList;

public class ContentReverseDisplay extends SimpleDisplay {
	@Override
    public void content(Article article) {
        ArrayList<String> content = article.getContent();
        for(int i=content.size()-1; i>=0; i--) {
            System.out.println(content.get(i));
        }
    }
}

ContentVerticalDisplay 클래스는 Article의 content를 세로방향으로 출력하며 다음과 같다.

package tstThread;

import java.util.ArrayList;

public class ContentVerticalDisplay extends SimpleDisplay {
	@Override
    public void content(Article article) {
		ArrayList<String> content = article.getContent();
		
		int maxChars = 0;
		int cntLines = content.size();
		
        for(int i=0; i<cntLines; i++) {
            int len = content.get(i).length();
        	if(len > maxChars) maxChars = len;
        }
        
        for(int iCh=0; iCh<maxChars; iCh++) {
        	for(int iLine=0; iLine<cntLines; iLine++) {
        		String line = content.get(iLine);
        		if(line.length() > iCh) {
        			System.out.print(line.charAt(iCh) + " ");
        		} else {
        			System.out.print("  ");
        		}
        	}
        	System.out.println();
        }
    }
}

IDisplay를 구현하는 SimpleDisplay, ContentReverseDisplay, ContentVerticalDisplay는 Article을 구성하는 title, content, footer 필드를 각각 어떻게 출력할지를 결정하는 구현에 대한 차원이다. 이제 이 IDisplay를 이용해 Article을 실제로 화면에 출력하는 클래스인 User는 다음과 같다.

package tstThread;

public class User {
	protected Article article;
	
	public User(Article article) {
		this.article = article;
	}
	
	public void print(IDisplay display) {
		display.title(article);
		display.content(article);
		display.footer(article);
	}
}

print 매서드를 통해 Article 객체를 IDisplay 인터페이스를 통해 출력하고 있는데, 출력하는 순서는 title, content, footer이다. 그런데 또 다른 요구사항으로 footer, content, title라는 순서로 출력하는 기능을 처리하기 위해 User를 상속받아 ReverseUser 클래스를 정의하며 다음과 같다.

package tstThread;

public class ReverseUser extends User {

	public ReverseUser(Article article) {
		super(article);
	}

	public void print(IDisplay display) {
		display.footer(article);
		display.content(article);
		display.title(article);		
	}
}

User와 ReverseUser는 Article을 구성하는 요소를 어떻게 조립할지를 결정하는 구현에 대한 차원이다. 이제 지금까지 정의한 클래스를 사용하는 코드는 다음과 같다.

package tstThread;

import java.util.ArrayList;

public class Main {
	public static void main(String[] args) {
		String title = "GIS, powerful tool";
        
        ArrayList<String> content = new ArrayList<String>();
        content.add("GIS is a geographic information system.");
        content.add("It is base on real spatial data.");
        content.add("It provides analyzing spatial data");
        
        String footer = "2020.10.08, written by Dip2K";
        
        Article article = new Article(title, content, footer);
        
        System.out.println("[CASE-1]");
        User case1 = new User(article);
        case1.print(new SimpleDisplay());
        System.out.println();
        
        System.out.println("[CASE-2]");
        User case2 = new ReverseUser(article);
        case2.print(new SimpleDisplay());
        System.out.println();
        
        System.out.println("[CASE-3]");
        User case3 = new ReverseUser(article);
        case3.print(new ContentReverseDisplay());
        System.out.println();
        
        System.out.println("[CASE-4]");
        User case4 = new User(article);
        case4.print(new ContentVerticalDisplay());
        System.out.println();
	}
}

실행 결과는 다음과 같다.

[CASE-1]
GIS, powerful tool
GIS is a geographic information system.
It is base on real spatial data.
It provides analyzing spatial data
2020.10.08, written by Dip2K

[CASE-2]
2020.10.08, written by Dip2K
GIS is a geographic information system.
It is base on real spatial data.
It provides analyzing spatial data
GIS, powerful tool

[CASE-3]
2020.10.08, written by Dip2K
It provides analyzing spatial data
It is base on real spatial data.
GIS is a geographic information system.
GIS, powerful tool

[CASE-4]
2020.10.08, written by Dip2K
G I I 
I t t 
S     
  i p 
i s r 
s   o 
  b v 
a a i 
  s d 
g e e 
e   s 
o o   
g n a 
r   n 
a r a 
p e l 
h a y 
i l z 
c   i 
  s n 
i p g 
n a   
f t s 
o i p 
r a a 
m l t 
a   i 
t d a 
i a l 
o t   
n a d 
  . a 
s   t 
y   a 
s     
t     
e     
m     
.     
GIS, powerful tool

Bridge 패턴을 통해 차원이 다른 구현을 분리함으로써 구현을 효과적으로 할 수 있으며, 구현된 기능을 다양하게 조합할 수 있다.

이 글은 소프트웨어 설계의 기반이 되는 GoF의 디자인패턴에 대한 강의자료입니다. 완전한 실습을 위해 이 글에서 소개하는 클래스 다이어그램과 예제 코드는 완전하게 실행되도록 제공되지만, 상대적으로 예제 코드와 관련된 설명이 함축적으로 제공되고 있습니다. 이 글에 대해 궁금한 점이 있으면 댓글을 통해 남겨주시기 바랍니다.