[20221029] 지오서비스웹 업데이트

지오서비스웹이 업데이트 되었습니다.
- 아카이브에서 CSV 파일의 내용을 바로 볼 수 있습니다.
- 좌표계 변환 기능이 추가되었습니다.
- 이외에도 소소하고 다양한 편의성이 개선되었습니다.
이번 업데이트가 반영된 것을 확인하기 위해서는 로그인 화면에서 GEOSERVICE-WEB v1.0.2가 표시됩니다.
three.js의 RenderTarget 주요 코드 (WebGLRenderTarget)
이 글은 제가 추후 개발시 참조하기 위해 정리한 글로 설명이 매우 함축적일 수 있습니다.
three.js의 RenderTarget은 WebGLRenderTarget 타입으로 Texture 객체를 내부적으로 가지고 있는데, 이 Texture에 장면을 렌더링할 수 있다. 이름이 RenderTarget인 이유는 three.js의 렌더러(Renderer)의 렌더링 대상으로 지정될 수 있기 때문이며 렌더링 대상으로 지정하기 위해 사용되는 메서드는 setRenderTarget이다.
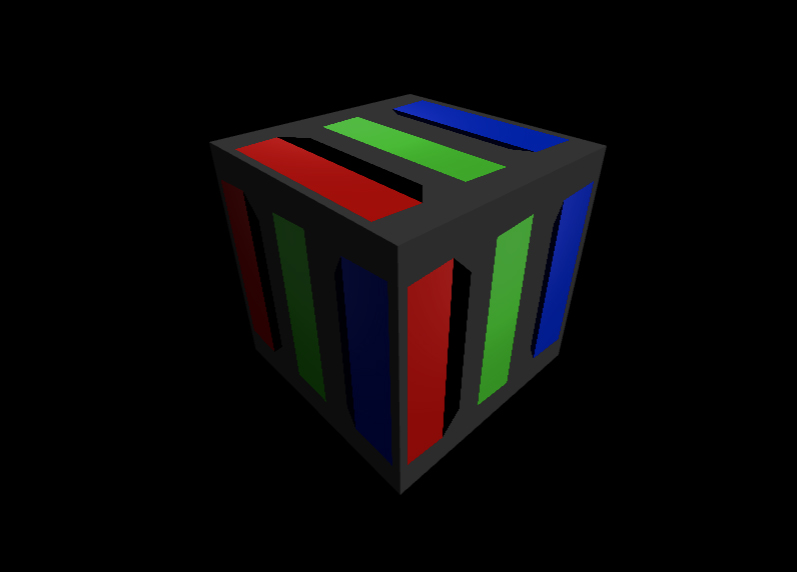
주요 코드를 정리한다. RenderTarget 객체를 생성하고 이 RenderTarget에 그려넣을 장면과 카메라 등을 준비하는 코드다.
_setupRenderTargets() {
    const rtSize = new THREE.Vector2(1024, 1024);
    const renderTarget = new THREE.WebGLRenderTarget(
        rtSize.width, rtSize.height,
        {
            depthBuffer: false, stencilBuffer: false
        }
    );

    const fov = 75;
    const aspect = rtSize.width / rtSize.height;
    const near = 0.1;
    const far = 5;
    const camera = new THREE.PerspectiveCamera(fov, aspect, near, far);
    camera.position.z = 4;

    const scene = new THREE.Scene();
    scene.background = new THREE.Color(0x444444);

    const color = 0xffffff;
    const intensity = 1;
    const light = new THREE.DirectionalLight(color, intensity);
    light.position.set(-1, 2, 4);
    scene.add(light);

    const geometry = new THREE.BoxGeometry(1,4,1);
    const makeInstance = (color, x) => {
        const material = new THREE.MeshPhongMaterial({ color });
        const cube = new THREE.Mesh(geometry, material);
        scene.add(cube);
        cube.position.x = x;
        return cube;
    };

    const cubes = [
        makeInstance(0xff0000, -2),
        makeInstance(0x00ff00, 0),
        makeInstance(0x0000ff, 2),
    ];

    this._renderTargetsObject = { camera, scene, renderTarget, cubes };
}
RenderTarget은 Texture로 사용될 수 있으므로 다음처럼 재질의 map 속성의 값으로 지정될 수 있다.
const material = new THREE.MeshPhongMaterial({
    map: this._renderTargetsObject.renderTarget.texture
});
RenderTarget도 렌더러에 의해 렌더링되어야 하므로 다음 코드가 필요하다.
this._renderer.setRenderTarget(this._renderTargetsObject.renderTarget);
this._renderer.render(this._renderTargetsObject.scene, this._renderTargetsObject.camera);
this._renderer.setRenderTarget(null);
결과는 다음과 같다.

three.js에서의 행렬 변환(Matrix Transformations)
이 글은 three.js의 공식 사이트에서 제공되는 글을 한글로 번역된 내용으로 내용을 좀더 이해하기 쉽게 보강하여 재 작성하였습니다..
three.js는 행렬을 사용해 3차원 변환(이동, 회전, 크기)에 대한 정보를 인코딩합니다. 여기서 인코딩이라는 의미가 수학적이지 못해 혼란스러운데 인코딩이라고 한 이유는 이동과 회전 그리고 크기에 대한 값을 각각의 속성으로 개발자가 지정하면 4×4 크기의 행렬 요소의 값으로 계산되어져 지정된다는 의미입니다. Object3D 클래스의 모든 인스턴세는 matrix 속성을 가지고 있으며 이 속성에는 객체의 위치, 회전, 크기에 대한 값이 저장되어 있습니다. 이 글은 객체의 변환이 어떻게 업데이트 되는지를 설명합니다.
편의 속성과 matrixAutoUpdate
객체의 변환을 업데이트하는 2가지 방식이 존재합니다.
첫번째는, 객체의 position, quaternion, scale 속성을 변경하면 three.js는 이 3개의 속성들을 이용해 객체의 matrix 속성을 다시 계산합니다.
object.position.copy( start_position );
object.quaternion.copy( quaternion );
기본적으로 matrixAutoUpdate 속성이 true 값으로 지정되어 있는데, 이 경우 앞서 말한 것처럼 행렬 속성은 자동으로 다시 계산되어 집니다. 만약 객체가 움직이지 않고 고정된 상태이거나 matrix에 대한 재계산을 수동으로 실행하고자 한다면 이 matrixAutoUpdate를 false로 지정해서 더 나은 성능을 도모할 수 있습니다.
object.matrixAutoUpdate = false;
위의 코드처럼 matrixAutoUpdate를 false로 지정했다면, matrix를 재계산하도록 하기 위해 다음 코드를 실행하면 됩니다.
object.updateMatrix();
두번째는, 객체의 matrix 속성을 직접 변경할 때입니다. Matrix4 클래스는 행렬의 갑슬 변경할 수 있는 다양한 메서드를 제공합니다.
object.matrix.setRotationFromQuaternion( quaternion );
object.matrix.setPosition( start_position );
object.matrixAutoUpdate = false;
이처럼 matrix 속성의 내부 값을 직접 변경한 경우 matrixAutoUpdate 속성을 반드시 false로 지정해야 한다는 점에 주의해야 하며 updateMatrix 매서드를 호출해서는 안됩니다. updateMatrix 매서드를 호출하는 순간 객체의
position, quaternion, scale 속성을 기반으로 matrix 속성이 재계산되기 때문입니다.
객체와 월드 행렬
객체의 matrix 속성은 객체의 변환에 대한 정보를 담고 있는데 이 값들은 객체의 부모에 대한 상대적인 값입니다. 월드 좌표계에 대한 객체의 변환 정보를 얻고자 한다면 반드시 객체의 matrixWorld 속성을 사용해야 합니다.
부모 또는 자식 객체의 변환이 변경되었을 때, 자식 객체의 matrixWorld 속성은 updateMatrixWorld 매서드를 호출함으로써 업데이트되게 할 수 있습니다.
회전과 쿼터니안(Quaternion)
three.js는 3차원 회전을 2가지 방식으로 제공합니다. 즉, 오일러 각(Euler angles)과 쿼터니안(Quaternions)입니다. 이 2개는 서로 변환될 수 있는 매서드를 제공합니다. 오일러 각은 짐벌락(Gimbal Lock)이라 문제를 가지고 있습니다. 짐벌락은 어떤 회전 상태에 도달하면 3개의 축에 대한 회전 자유도가 소실되는 문제로 서로 다른 축으로 회전을 아무리 해도 오직 한개의 축에 대해서만 회전되는 문제입니다. 이러한 이유로 객체의 회전 정보는 항상 쿼터니안 속성에 저장되어 있습니다.
three.js이 과거 버전에서는 useQuaternion이라는 속성을 제공하여 false로 지정하면 오일러 각을 사용해 matrix 속성을 재계산합니다. 이런 방식은 폐기 되었으며 만약 이런 방식의 사용이 필요하다면 setRotationFromEuler 매서드를 사용하여 객체의 quaternion 속성을 업데이트 하도록 해야 합니다.


