
마크 저커버그가 딸에게 보내는 편지의 내용 중 ..

“신문은 늘 잘못된 것들로 가득차 있지만 실제로는 그렇지 않단다. 세상은 조금씩 나아지고 있단다. 수명은 늘어나고, 빈곤은 줄어들며, 지식은 늘어나고 있지. 그리고, 세상의 사람들은 서로 연결되고 있단다. 기술의 발전 덕분에 아마 너는 우리보다 훨씬 더 나은 세상에서 살아가겠지.”
남들이 말해서라거나, 또는 스스로 조금 격은 것을 통해 세상 전부를 부정적으로 일반화시켜 버리는 사람들이 많아질수록, 마치 전염병처럼 세상은 정말 부정적으로 병들어 가는 것이다. 내가 이런 사람이였다면 여기까지만, 앞으로는 그만.
덧글, 2023년 12월 : 저커버그는 결국 돈에 눈이 멀어 맛이 가 버렸다.
주소를 좌표로, GeoCoder-Xr with Kakao, Naver, Google ㅡ 2016, v3.2
- 최신 OpenAPI 반영 및 OpenAPI Key 값을 저장할 수 있도록 하였습니다 ㅡ 2016/01/03
- 결과 SHP 파일을 상대경로로 지정할 경우에 대한 문제점을 개선하였습니다 ㅡ 2013/12/09
- 지도 표시 창이 나타날때 다운되는 현상 제거하였습니다 ㅡ 2013/06/10
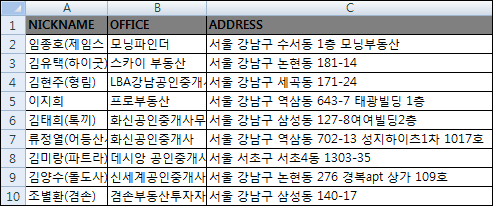
옛날 주소 또는 새주소를 X,Y나 경위도와 같은 좌표로 변환해 주는 기능을 지오코딩(Geocoding)이라고 합니다. 이 툴은 주소를 좌표로 변환해 주는 툴로써 기존의 GeoCoder의 기능을 개선한 버전(3.0)입니다. 많은 주소를 자동으로 손쉽게 변환할 수 있는데, 변환하고자 하는 주소의 목록은 엑셀을 통해 쉽게 만들 수 있습니다.
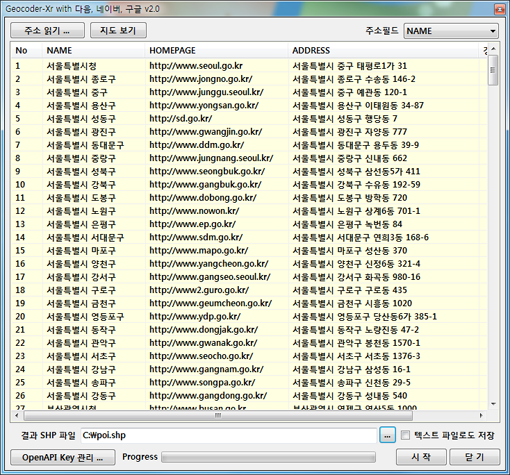
결과 좌표 데이터를 SHP 뿐만 아니라 텍스트 파일로 저장할 수 있습니다. 변환된 결과 좌표는 지도 위에 표시됩니다. 변환에 실패한 주소(일반적으로 잘못된 주소임)를 별도의 파일로 저장해 놓을 수 있습니다. 이는 텍스트 파일로 저장하기 옵션이 활성화 되어 있을 경우에 가능합니다.
엑셀 등을 통해 얻은 주소 데이터를 아래의 그림에서처럼 불러와 좌표로 변환할 수 있습니다. 주의할 점은
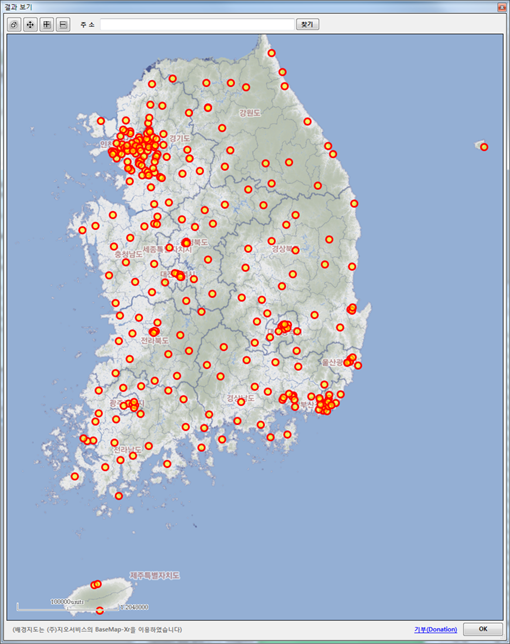
좌표 변환이 완료되면 변환된 좌표가 실제 지도 상에 어디에 분포되는지 파악할 수 있도록 아래 그림처럼 지도 위에 맵핑되는 기능을 제공합니다. 이 기능은 좌표 변환이 완료되면 자동으로 나타납니다.
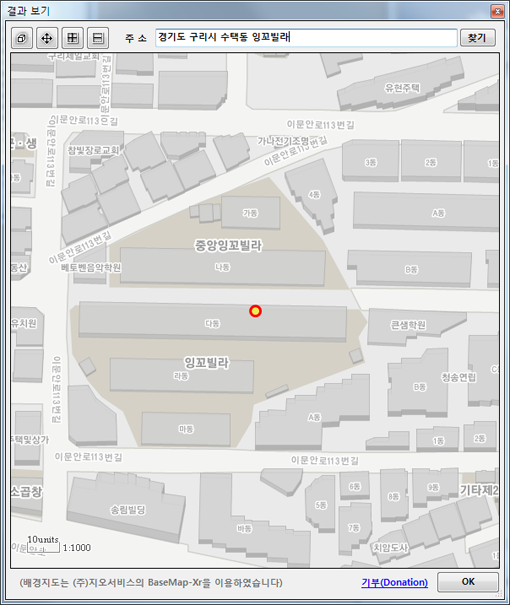
또한 지도가 표시되는 상태에서 상단에 직접 주소를 입력하고 찾기 버튼을 클릭하면 해당 위치로 지도가 이동됩니다.
또한 SHP 파일로 저장하기와 지도 표현 기능은 지오서비스의 듀라맵을 이용하였으므로 이 프로그램을 실행하기에 앞서 듀라맵의 최신버전(3.8 이상)을 먼저 설치하셔야 합니다. 듀라맵은 다음 URL을 통해 다운로드 받으실 수 있습니다.
C#으로 SQLite 다루기
메모리 기반에서 자료를 다루기 위해 Array나 Linked List 그리고 Hashmap 등을 사용하지만, 대용량 또는 SQL 문을 통한 다양한 조건검색을 위해 DBMS을 사용해야할 때가 있습니다. 설치도 필요없고 가볍고 빠르게 사용할 수 있는 Local DBMS로 SQLite는 안드로이드나 SVN 등과 같이 매우 광범위하게 사용되는데.. C#으로 이 SQLite를 다루는 내용에 대해 정리를 해 봅니다.
C#에서 SQLite를 사용하기 위해서는 먼저 .NET용 SQLite 어셈블리 모듈을 설치해야 합니다. SQLite 공식 사이트에서 관련 파일을 설치할 수 있는 setup 파일을 받아 설치하기 바랍니다.
개발을 위해 필요한 파일이 설치되면 Visual Studio에서 C# 프로젝트를 생성하고 아래의 화면처럼 어셈블리 참조를 추가해 줍니다.
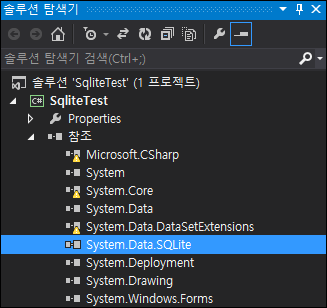
위의 화면에서 추가한 System.Data.SQLite 참조는 SQLite를 위한 ADO.NET 데이터 제공자(Data Provider)입니다. 이 참조는 앞서 설치된 폴더에 System.Data.SQLite.dll 파일을 통해 추가할 수 있습니다.
참조를 추가했으므로 코드에서 참조와 관련된 클래스를 빠르게 접근하기 위한 아래의 using 문을 추가합니다.
using System.Data.SQLite;
이제 다음과 같은 폼을 디자인함으로써 SQLite에 대한 주요 내용에 대한 코드를 살펴 보겠습니다.
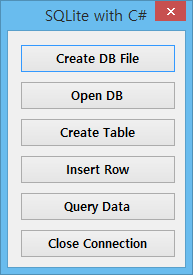
폼 상에 버튼의 제목을 통해 우리가 파악할 SQLite에 대한 코드가 무엇인지 짐작할 수 있습니다. 즉, 아래와 같습니다.
- Create DB File – SQLite DB 파일을 생성합니다.
- Open DB – 생성한 DB 파일을 사용하기 위해 연결합니다.
- Create Table – DB 파일에 테이블을 생성합니다.
- Insert Row – 생성한 테이블에 Row를 추가합니다.
- Query Data – 테이블에 저장된 데이터를 조회합니다.
- Close Connection – DB 파일에 대한 연결을 닫습니다.
먼저 SQLite DB 파일을 생성하는 버튼에 대한 코드는 다음과 같습니다.
SQLiteConnection.CreateFile("c:/a.sqlite");
위의 코드가 성공한다면 C:\ 경로에 a.sqlite라는 파일이 생성될 것입니다. 다음은 생성한 DB 파일을 사용하기 위해 연결하는 코드입니다.
conn = new SQLiteConnection("Data Source=c:/a.sqlite;Version=3;");
conn.Open();
위의 코드에서 conn 변수는 다음과 같이 정의되어 있습니다.
private SQLiteConnection conn = null;
이제 다음은 DB 파일에 테이블을 생성하는 코드입니다.
string sql = "create table members (name varchar(20), age int)";

SQLiteCommand command = new SQLiteCommand(sql, conn);
int result = command.ExecuteNonQuery();

sql = "create index idx01 on members(name)";
command = new SQLiteCommand(sql, conn);
result = command.ExecuteNonQuery();
우리가 흔히 알고 있는 CREATE SQL 문을 통해 테이블을 생성하고 있습니다. 추가적으로 인덱스(INDEX)까지도 생성하고 있습니다. 이제 다음은 생성한 테이블에 Row를 추가하는 코드입니다.
String sql = "insert into members (name, age) values ('김도현', 6)";

SQLiteCommand command = new SQLiteCommand(sql, conn);
int result = command.ExecuteNonQuery();
아.. 우리 와이프 코고는 소리가 들리네요.. -_-; 여튼.. 위의 코드를 보면 Row를 추가하기 위해 흔히 알고 있는 INSERT SQL문을 사용하고 있습니다. 다음은 테이블에 저장된 데이터에 대한 조회 코드입니다.
String sql = "select * from members";

SQLiteCommand cmd = new SQLiteCommand(sql, conn);
SQLiteDataReader rdr = cmd.ExecuteReader();
while (rdr.Read()) {
    MessageBox.Show(rdr["name"] + " " + rdr["age"]);
}

rdr.Close();
SELECT SQL문을 통해 조회할 수 있으며, SQLiteDataReader 클래스를 통해 실제 조회된 데이터를 필드별로 읽어 낼 수 있는 것을 볼 수 있습니다. 이제 끝으로 DB에 연결된 Connection 객체를 닫는 코드는 아래와 같습니다.
conn.Close();
자, 이상으로 요긴하게 바로 사용할 수 있는 Local DBMS인 SQLite를 C#에서 사용할 수 있는 최소한의 내용을 정리해 보았습니다.
DuraMap-Xr의 SpatialOperator를 이용한 공간연산 응용예
DuraMap-Xr은 Windows 기반의 Desktop GIS Application 개발을 위한 맵 엔진입니다. DuraMap-Xr의 기능 중 SpatialOperator 기능은 벡터 데이터 간의 Intersects나 Intersection과 같은 API와 단일 벡테 데이터의 Buffer 연산자와 같은 API를 제공합니다. 이러한 연산자를 이용하여 다음과 같은 기능에 DuraMap-Xr이 활용되었는데요. 간단히 소개해 봅니다.
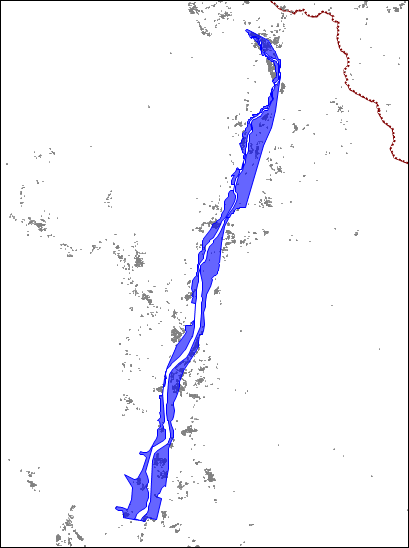
위의 그림은 건물 레이어와 홍수범람에 대한 하천 레이어 그리고 행정구역도 레이어로 구성된 간단한 지도입니다. 건물 레이어의 건물 도형 데이터에는 인구수에 대한 속성 데이터가 조인되어 있습니다. 건물 중 홍수범람에 대한 하천 레이어의 도형과 교차(Intersects)되는 건물을 추출하고 추출된 건물에 거주하는 인구수의 총합을 계산해야 합니다. 바로 이 인구수가 홍수에 의한 피해 인구수라고 생각할 수 있습니다.
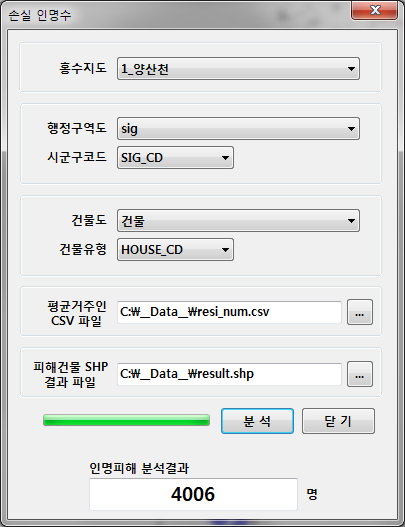
위의 UI는 위에서 설명한 기능에 대해 실제 구현한 UI입니다. 홍수피해의 결과로 4006명이 산출되었고, 피해를 받은 건물은 result.shp 파일로 저장되도록 하였습니다.
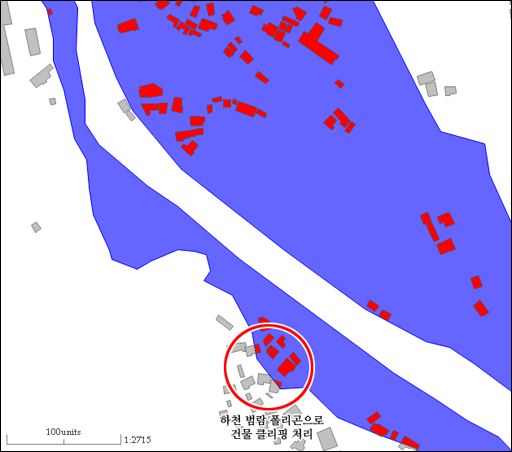
위의 이미지에서 빨간색 도형이 기능에 대한 결과로 생성된 홍수 피해를 받은 건물에 대한 레이어어 입니다. 이미지를 살펴보면, 건물이 하천 경계 도형으로 클리핑(Intersection) 처리 되어 저장된 것을 볼 수 있습니다.
DuraMap-Xr은 우리가 흔히 알고 있는 지도 위에 도형 매쉬업이라는 단순한 기능에서 한발 더 나아가 각 도형들간의 관계와 연산을 통해 더욱 의미 있는 결과를 생성해 내는 GIS 엔진입니다.

