공간 데이터는 위치 데이터와 속성 데이터의 조합입니다. 단순히 공간 데이터를 일괄적으로 원하는 색상이나, 아이콘 등으로 표현할 수 있지만 각각의 공간 데이터에 대한 속성 데이터를 활용하여 다양한 형태로 그리고자 할 때가 있습니다. 예를 들어 아래와 같은 공간 데이터 테이블이 있다고 합시다.
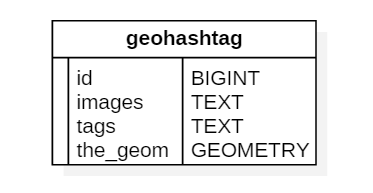
위의 테이블에서 images는 서버 측에 저장된 이미지 파일명에 대한 리스트이고, tags는 이미지에 대한 해시태그 성격의 값입니다. 그리고 the_geom은 좌표 데이터입니다. 이 3개의 값을 이용해 특정 위치에 이미지와 해시태그를 표현하고자 할 때, 클라이언트 GIS 엔진인 FingerEyes-Xr의 어떤 API를 활용해 구현할 수 있는지 정리해 봅니다. 먼저 아래는 위의 3개의 속성값을 이용해 실제로 구현된 결과에 대한 화면입니다.

FingerEyes-Xr에서는 공간 데이터를 그릴 때, 특히 포인트 데이터에 대해서 다음처럼 표현하고자 하는 마커 심벌을 지정할 수 있습니다.
var customSym = new GeoHashTagMarkerSymbol();
layer.theme().markerSymbol(customSym);
즉, 공간 데이터를 그리는 방식을 지정하는 GeoHashTagMarkerSymbol 클래스를 정의해 생성한 후, 공간 데이터에 대한 레이어의 Theme에 대해 MarkerSymbol로써 지정하면 됩니다. 바로 이 GeoHashTagMarkerSymbol의 Javascript의 구현은 아래와 같습니다.
GeoHashTagMarkerSymbol = Xr.Class({
    requires: [Xr.symbol.IMarkerSymbol],

    construct: function () { },

    methods: {
        /* SVG Element */ create: function (/* PointD */ point,
            /* AttributeRow */ attrRow, /* CoordMapper */ coordMapper) {
            var vp = coordMapper.W2V(point);
            var vpx = vp.x, vpy = vp.y;

            var tags = attrRow.valueAsString(0); // tags 필드의 값
            var imageFile = attrRow.valueAsString(1); // images 필드의 값
            var w = this.wSize(), h = this.hSize();
            var g = document.createElementNS(xmlns, "g");

            var image = document.createElementNS(xmlns, "image");
            image.setAttribute("x", vpx - w / 2);
            image.setAttribute("y", vpy - w / 2);
            image.setAttribute("width", w);
            image.setAttribute("height", w);
            image.setAttributeNS("http://www.w3.org/1999/xlink", "href", imageFile);

            g.appendChild(image);

            var textStroke = document.createElementNS(xmlns, "text");
            textStroke.setAttribute("x", vpx);
            textStroke.setAttribute("y", vpy + h / 2 - 6);
            textStroke.setAttribute("text-anchor", "middle");
            textStroke.setAttribute("stroke", "black");
            textStroke.textContent = tags;
            g.appendChild(textStroke);

            return g;
        },

        /* number */ wSize: function () {
            return this._width;
        },

        /* number */ hSize: function () {
            return this._height;
        },
    }
});
2번 코드에서처럼 Xr.symbol.IMarkerSymbol 인터페이스를 구현하겠다고 명시하고, 4번 코드의 생성자에서 필요로 값을 미리 정의해 두며, 10번 코드의 create에서 지도 상에 표현할 SVG 요소를 생성해 반환합니다. 40번과 44번 코드의 wSize, hSize 함수를 통해 심벌의 크기를 정하게 됩니다.