손실함수는 비용함수(Cost Function)라고도 합니다. 손실에는 그만큼의 비용이 발생한다는 개념에서 말입니다. 손실함수가 왜 필요한지부터 파악하기 위해 다음과 같은 데이터가 있다고 합시다.
t = [0, 0, 0, 0.5, 0.5, 0, 0, 0, 0, 0]
총 10개 값으로, 어떤 입력값이 0~9중 어떤 값인지를 나타내는 확률값 입니다. 첫번째 값이 0일때의 확률이고, 두번째가 1일때의 확률입니다. 즉, 위의 값은 3일때와 4일때의 확률이 각각 50%인 셈입니다.
위의 데이터는 항상 옳은 경우의 실제값라고 합시다. 이제.. 아래의 데이터는 계산된, 즉 예측된 데이터입니다.
y = [0.01, 0.01, 0.1, 0.3, 0.33, 0.04, 0.02, 0.05, 0.01, 0.1]
위의 예측 데이터 역시 0~9중 어떤 값일 거라는 계산된 확률값으로써 0일 확률은 1%, 2일 확률은 10%, 3일 확률은 30%라고 예측하고 있습니다. 그럼, 이 예측값와 실제값에 대한 오차는 어떻게 계산할 수 있을까요? 바로 이 오차가 손실함수의 값이 됩니다.
손실함수는 흔히 평균제곱오차(Mean Squared Error, MSE)와 교차 엔트로피 오차(Cross Entropy Error, CEE)가 사용됩니다.
평균 제곱 오차(Mean Squared Error, MSE)
MSE의 공식은 다음과 같습니다.

앞서 언급한 실제값 t와 예측값 y에 대한 평균제곱오차의 손실값은 아래의 파이선 코드를 통해 얻을 수 있습니다.
import numpy as np

def MSE(y, t):
    return 0.5 * np.sum((y-t)**2)

t = np.array([0, 0, 0, 0.5, 0.5, 0, 0, 0, 0, 0])
y = np.array([0.01, 0.01, 0.1, 0.3, 0.33, 0.04, 0.02, 0.05, 0.01, 0.1])

print(MSE(t,y))
위의 출력값으로써 손실값은 0.04685 입니다. 그럼 동일한 t에 대해 상대적으로 잘못 예측한 상황의 y값을 아래처럼 얻었다고 가정합시다.
y = [0.3, 0.01, 0.1, 0.01, 0.04, 0.02, 0.05, 0.33, 0.01, 0.1]
위에 대한 손실값은 0.33685 입니다. 즉 손실값이 예상했던 것처럼 상대적으로 큽니다.
교차 엔트로피 오차(Cross Entropy Error, CEE)
CEE의 수식은 다음과 같습니다.

위이 식에서 log는 밑이 e인 자연로그입니다. CEE의 이해를 위해 자연로그에 대한 그래프를 시각화해 보는 코드는 다음과 같습니다.
import numpy as np
import matplotlib.pyplot as plt

x = np.arange(0, 1, 0.01)
y = np.log(x)

plt.plot(x, y)
plt.show()
그래프는 다음과 같습니다.
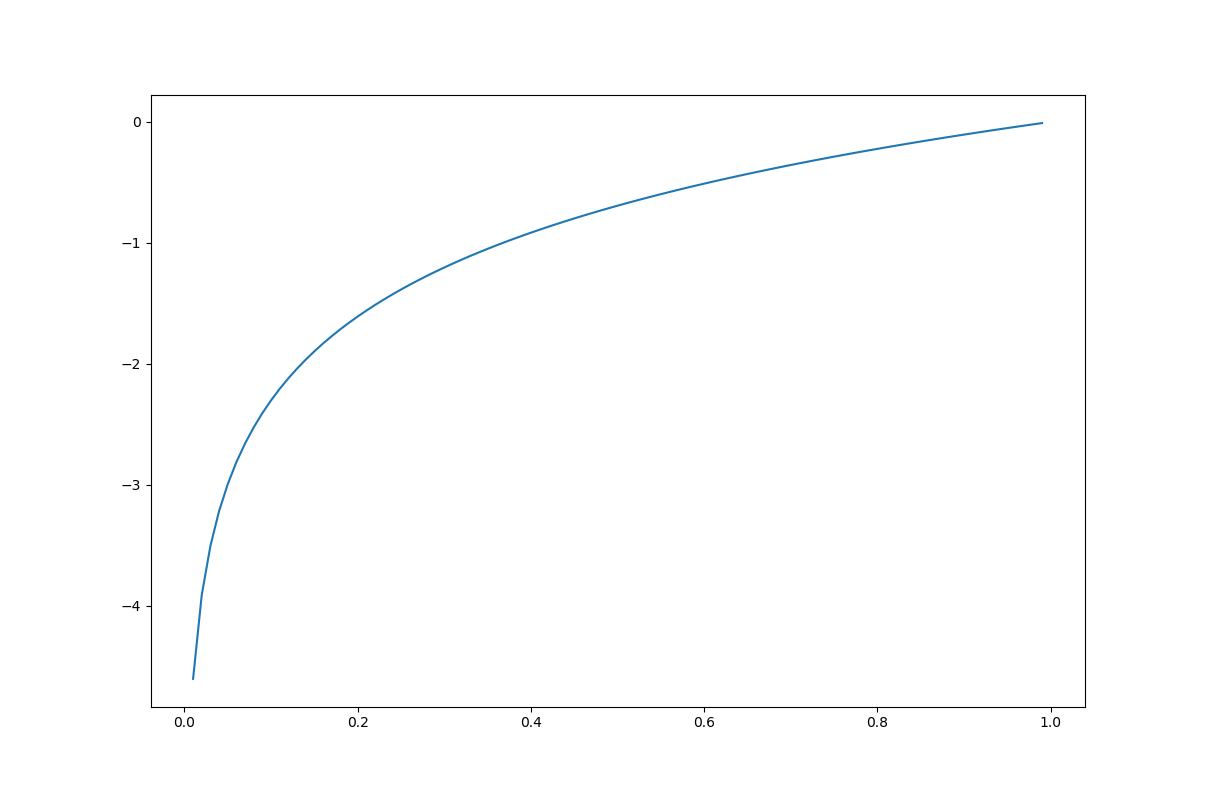
가로축은 정답일 확률이고, y 축은 손실값에 -1을 곱한 값입니다. 가로축값이 1, 즉 정답이 확률이 100%일때 손실값은 0이 되고, 정답이 확률이 낮아 질수록 손실값은 무한대로 커지게 됩니다.
이제 앞서 언급한 실제값 t와 예측값 y에 대한 교차 엔트로피 오차, CEE를 얻는 파이선 코드는 다음과 같습니다.
import numpy as np

def CEE(y, t):
    delta = 1e-10
    return -np.sum(t*np.log(y+delta))

t = np.array([0, 0, 0, 0.5, 0.5, 0, 0, 0, 0, 0])
y0 = [0, 0, 0, 0.5, 0.5, 0, 0, 0, 0, 0]
y1 = [0.01, 0.01, 0.1, 0.3, 0.33, 0.04, 0.02, 0.05, 0.01, 0.1]
y2 = np.array([0.3, 0.01, 0.1, 0.01, 0.04, 0.02, 0.05, 0.33, 0.01, 0.1])

print(CEE(t,y0)) # 0.6931471803599453
print(CEE(t,y1)) # 8.265472039806522
print(CEE(t,y2)) # 21.21844021456322
보시는 것처럼 실제값에서 예측값이 멀어질 수록 손실값이 커지는 것을 알 수 있습니다.