Activity를 사용자가 조작하면서 그 상태가 변경되는데, 그 변경에서 발생하는 이벤트에 대한 정리입니다. 다양한 상태 변화가 존재하지만 이 글에서는 2가지의 경우로 나눠 기술합니다.
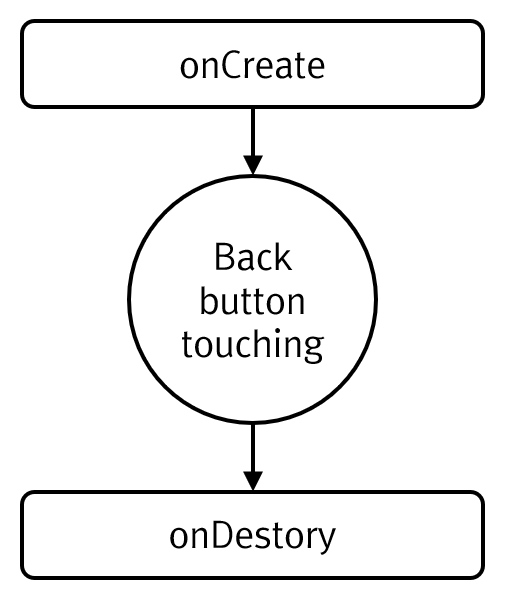
첫번째는 activity를 실행하고 바로 뒤로 가기 버튼을 눌러 종료할때에 대한 이벤트 호출 순서입니다.
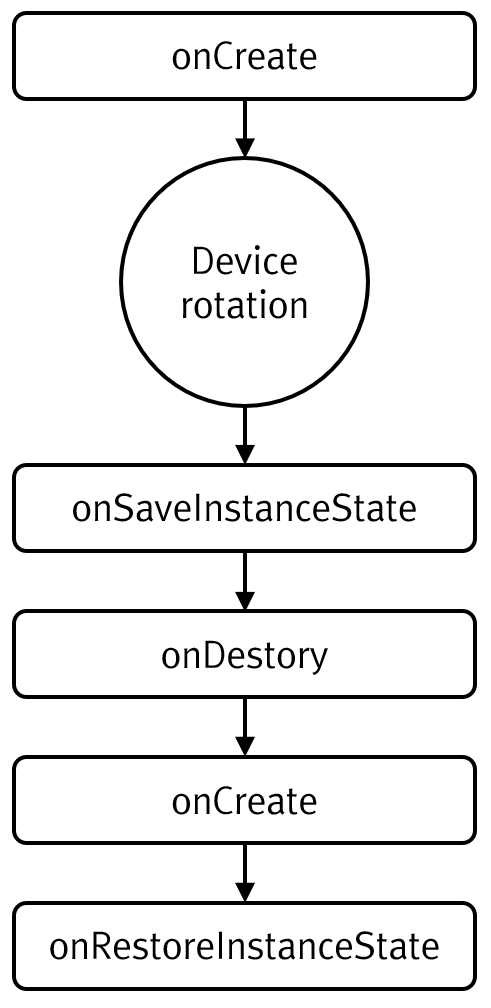
두번째는 activity를 실행하고 단말기를 회전하여 activity를 회전시켰을때에 대한 이벤트 호출 순서입니다.

공간정보시스템 / 3차원 시각화 / 딥러닝 기반 기술 연구소 @지오서비스(GEOSERVICE)
Activity를 사용자가 조작하면서 그 상태가 변경되는데, 그 변경에서 발생하는 이벤트에 대한 정리입니다. 다양한 상태 변화가 존재하지만 이 글에서는 2가지의 경우로 나눠 기술합니다.
첫번째는 activity를 실행하고 바로 뒤로 가기 버튼을 눌러 종료할때에 대한 이벤트 호출 순서입니다.
두번째는 activity를 실행하고 단말기를 회전하여 activity를 회전시켰을때에 대한 이벤트 호출 순서입니다.
이 글은 안드로이드에서 사진을 찍은 후 원본 이미지를 파일로 저장하고 ImageView에 해당 사진 이미지를 표시하는 예제이다.
먼저 카메라 기능 및 외부 저장소에 대한 읽기/쓰기 퍼미션을 지정하기 위해 AndroidManifest.xml에 다음 코드를 추가한다.
<uses-permission android:name="android.permission.WRITE_EXTERNAL_STORAGE" />
<uses-permission android:name="android.permission.CAMERA" />
<uses-permission android:name="android.permission.READ_EXTERNAL_STORAGE" />
<uses-feature android:name="android.hardware.camera2" android:required="true" />
이왕 AndroidManifest.xml 파일을 편집하는 김에 Provider를 추가하자. Provider를 추가하는 이유는 외부 카메라 앱을 연동해서 사진을 찍을 건데, 카메라 앱이 사진을 찍은 후 지정된 파일에 사진 이미지를 저장하도록 하기 위해 파일에 대한 Provider가 필요하기 때문이다. 추가한 코드는 다음과 같다.
<application ... >

    <provider
        android:authorities="com.example.myapplication.fileprovider"
        android:name="androidx.core.content.FileProvider"
        android:exported="false"
        android:grantUriPermissions="true">
        <meta-data
            android:name="android.support.FILE_PROVIDER_PATHS"
            android:resource="@xml/file_paths" />
    </provider>

    ...
위의 Provider 코드 중 android:authorities 속성값에는 App의 Package명에 “.fileprovider”를 붙여 지정하였다. 파일 Provider가 외부의 앱에 공유하고자 하는 디렉토리를 meta-data에 지정하고 있는데 xml 파일은 file_paths에 관련 정보를 지정했으며 다음과 같다. 리소스에 xml 폴더를 만든 후에 file_paths.xml 파일을 추가한 뒤 아래의 내용을 입력한다.
<?xml version="1.0" encoding="utf-8"?>
<paths xmlns:android="http://schemas.android.com/apk/res/android">
    <external-path name="files" path="Android/data/com.example.myapplication/files" />
</paths>
위의 내용은 이 앱이 접근할 수 있는 디렉토리인 Android/data/com.example.myapplication/files의 하위 폴더 전체를 공유할 수 있다.
카메라를 실행하고 사진을 찍어 그 내용을 표시하는 UI에 대한 레이아웃은 다음과 같다.
<?xml version="1.0" encoding="utf-8"?>
<LinearLayout xmlns:android="http://schemas.android.com/apk/res/android"
    android:orientation="vertical"
    android:layout_width="match_parent"
    android:layout_height="match_parent">

    <Button
        android:layout_width="100dp"
        android:layout_height="58dp"
        android:id="@+id/btn_photo"
        android:layout_gravity="center"
        android:text="사진찍기" />


    <ImageView
        android:id="@+id/iv_photo"
        android:layout_width="match_parent"
        android:layout_height="match_parent" />

</LinearLayout>
이제 이 레이아웃에 대한 Activity 코드는 다음과 같다.
package com.example.myapplication

import android.Manifest
import android.content.Intent
import android.content.pm.PackageManager
import android.graphics.ImageDecoder
import android.net.Uri
import android.os.Build
import androidx.appcompat.app.AppCompatActivity
import android.os.Bundle
import android.os.Environment
import android.provider.MediaStore
import android.util.Log
import android.widget.Button
import android.widget.ImageView
import androidx.core.app.ActivityCompat
import androidx.core.content.FileProvider
import java.io.File
import java.io.IOException
import java.text.SimpleDateFormat
import java.util.*

class MainActivity : AppCompatActivity() {
    val TAG = "DIP2K"
    lateinit var btn_photo: Button
    lateinit var iv_photo: ImageView

    var m_imageFile: File? = null
    val REQUEST_TAKE_PHOTO = 100

    override fun onCreate(savedInstanceState: Bundle?) {
        super.onCreate(savedInstanceState)
        setContentView(R.layout.activity_main)

        iv_photo = findViewById(R.id.iv_photo)
        btn_photo = findViewById(R.id.btn_photo)

        if(Build.VERSION.SDK_INT >= Build.VERSION_CODES.M) {
            if(checkSelfPermission(Manifest.permission.CAMERA)
                == PackageManager.PERMISSION_GRANTED
                && checkSelfPermission(Manifest.permission.WRITE_EXTERNAL_STORAGE)
                    == PackageManager.PERMISSION_GRANTED) {
            } else {
                ActivityCompat.requestPermissions(this,
                    arrayOf(Manifest.permission.CAMERA, Manifest.permission.WRITE_EXTERNAL_STORAGE), 1)
            }
        }

        btn_photo.setOnClickListener {
            val takePictureIntent = Intent(MediaStore.ACTION_IMAGE_CAPTURE)
            if(takePictureIntent.resolveActivity(getPackageManager()) != null) {
                createImageFile()?.let {
                    val photoURI = FileProvider.getUriForFile(this,
                        "com.example.myapplication.fileprovider", it)

                    takePictureIntent.putExtra(MediaStore.EXTRA_OUTPUT, photoURI)
                    startActivityForResult(takePictureIntent, REQUEST_TAKE_PHOTO)

                    m_imageFile = it
                }
            }

        }
    }

    override fun onRequestPermissionsResult(
        requestCode: Int,
        permissions: Array<out String>,
        grantResults: IntArray
    ) {
        super.onRequestPermissionsResult(requestCode, permissions, grantResults)

        if(grantResults[0] == PackageManager.PERMISSION_GRANTED
            && grantResults[1] == PackageManager.PERMISSION_GRANTED) {
            Log.d(TAG, "Permisson: " + permissions[0] + " was " + grantResults[0])
        }
    }

    override fun onActivityResult(requestCode: Int, resultCode: Int, data: Intent?) {
        super.onActivityResult(requestCode, resultCode, data)
        if(requestCode == REQUEST_TAKE_PHOTO) {
            if(resultCode == RESULT_OK) {
                m_imageFile?.let {
                    if(Build.VERSION.SDK_INT >= Build.VERSION_CODES.Q) {
                        val source = ImageDecoder.createSource(contentResolver, Uri.fromFile(it))
                        ImageDecoder.decodeBitmap(source)?.let {
                            iv_photo.setImageBitmap(it)
                        }
                    } else {
                        MediaStore.Images.Media.getBitmap(contentResolver, Uri.fromFile(it))?.let {
                            iv_photo.setImageBitmap(it)
                        }
                    }
                }
            }
        }
    }

    private fun createImageFile(): File {
        val timeStamp = SimpleDateFormat("yyyyMMdd_HHmmss").format(Date())
        val imageFileName = "PHOTO_${timeStamp}.jpg"
        val storageDir = getExternalFilesDir(Environment.DIRECTORY_PICTURES)
        return File(storageDir, imageFileName)
    }
}
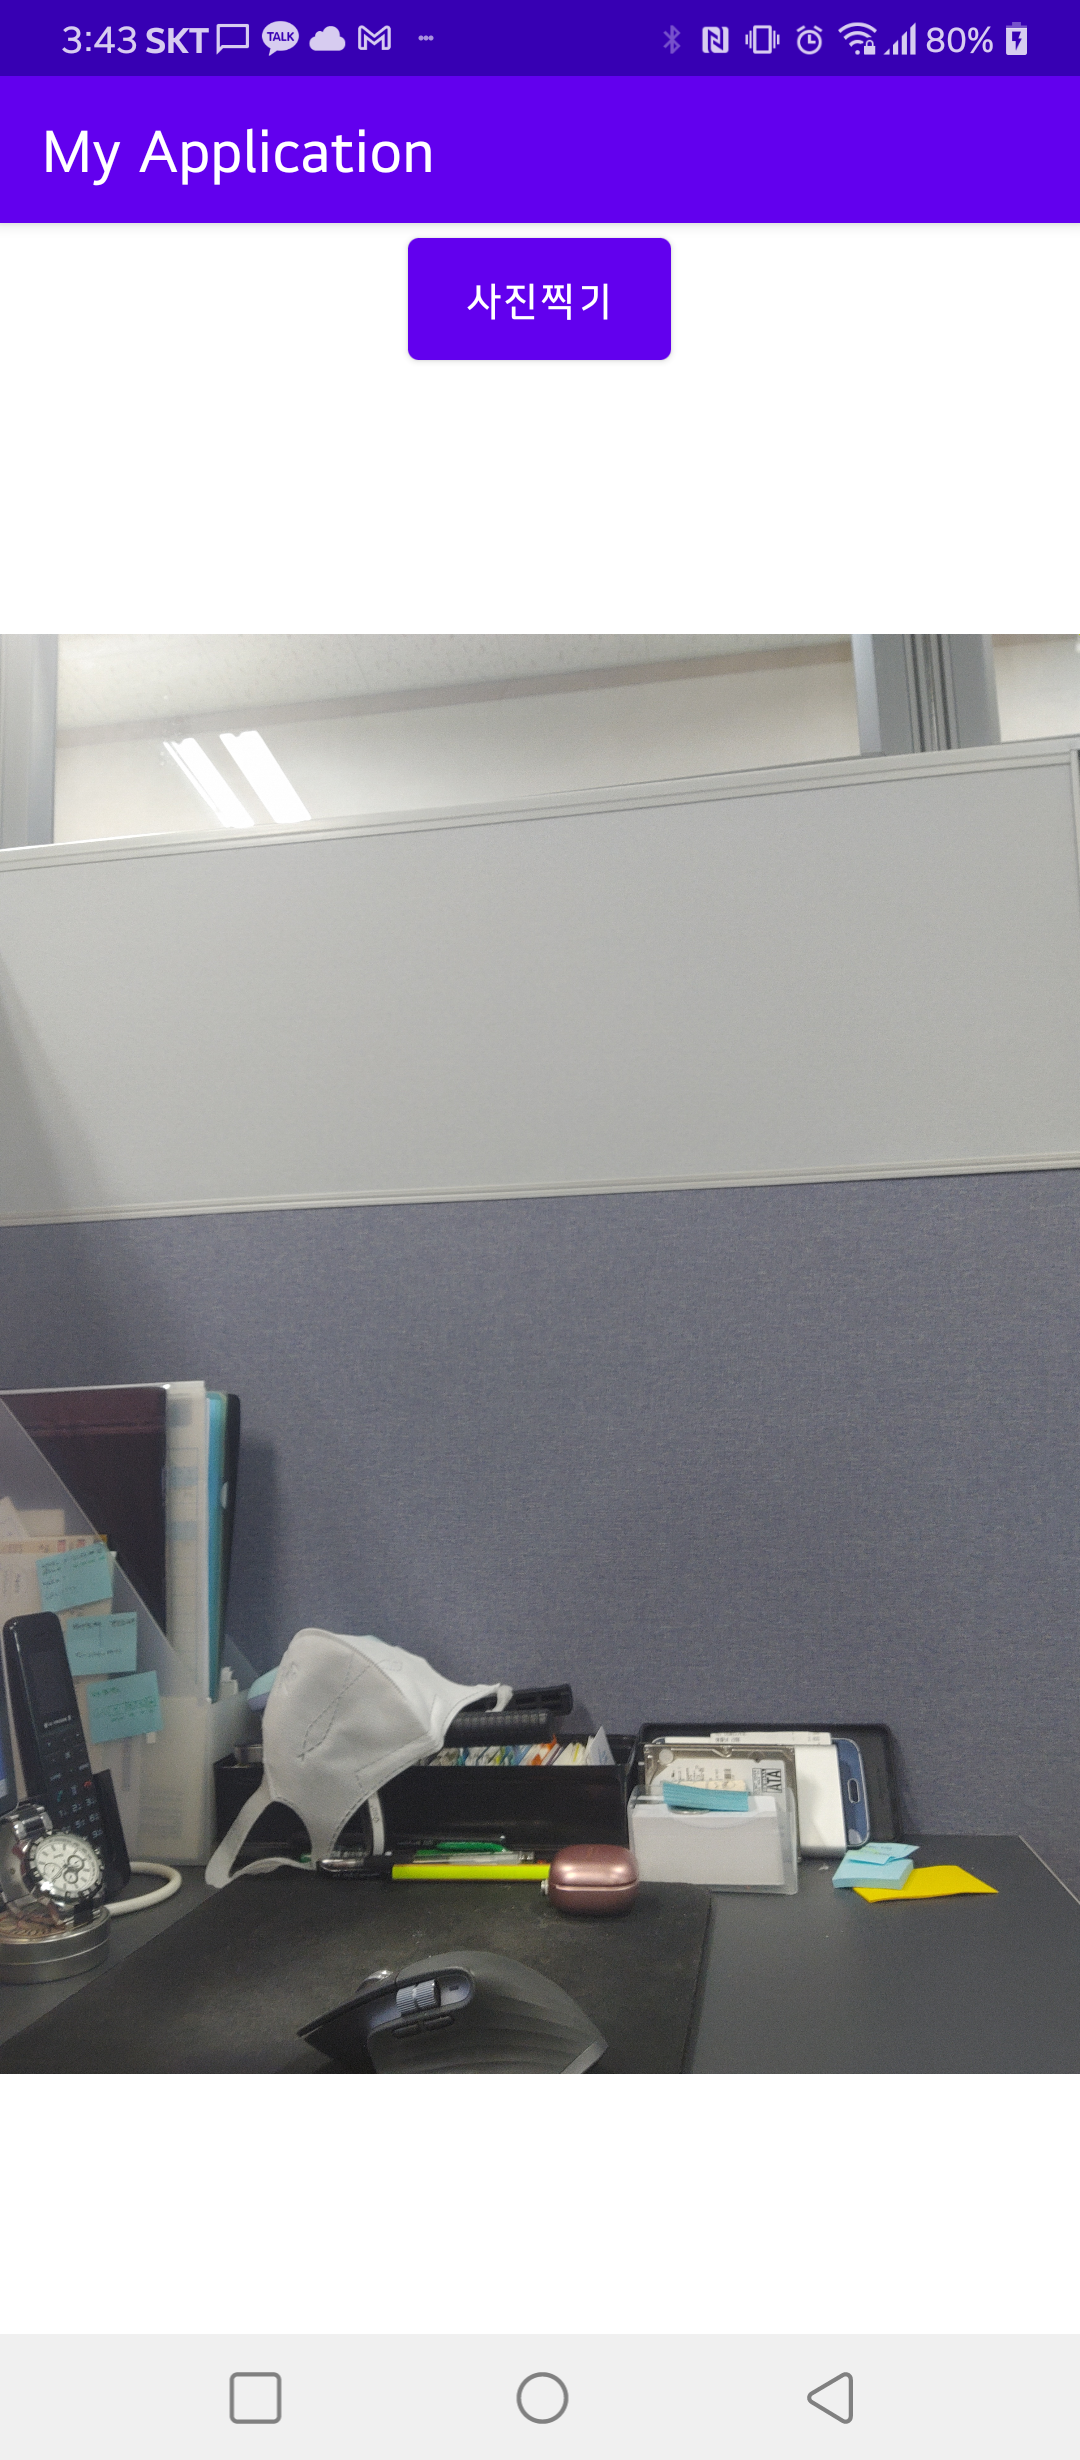
실행 결과는 다음과 같다.
화면 터치가 가능한 모바일 단말기에서 터치를 통한 UI의 조작은 매우 효과적입니다. 이러한 터치 기반의 UI의 활용에 대해 자연스러운 사용은 사용자에게 프로그램의 친밀도를 높여줍니다. 화면 터치에 대한 조작 중 Swiping은 사용자가 화면을 스치듯이 상하좌우로 쓸어넘기는 행위입니다. 이러한 Swiping 중 좌우에 대한 이벤트를 처리하기 위한 클래스는 다음과 같습니다.
package geoservice.nexgen

import android.content.Context
import android.view.GestureDetector
import android.view.MotionEvent
import android.view.View

abstract class OnSwipeTouchListener(context: Context?) : View.OnTouchListener {
    companion object {
        private const val SWIPE_DISTANCE_THRESHOLD = 100
        private const val SWIPE_VELOCITY_THRESHOLD = 100
    }

    private val gestureDetector: GestureDetector

    abstract fun onSwipeLeft()
    abstract fun onSwipeRight()

    override fun onTouch(v: View?, event: MotionEvent?): Boolean {
        return gestureDetector.onTouchEvent(event)
    }

    private inner class GestureListener : GestureDetector.SimpleOnGestureListener() {
        override fun onDown(e: MotionEvent): Boolean {
            return true
        }

        override fun onFling(e1: MotionEvent, e2: MotionEvent, velocityX: Float, velocityY: Float): Boolean {
            val distanceX = e2.x - e1.x
            val distanceY = e2.y - e1.y
            if (Math.abs(distanceX) > Math.abs(distanceY)
                    && Math.abs(distanceX) > SWIPE_DISTANCE_THRESHOLD
                    && Math.abs(velocityX) > SWIPE_VELOCITY_THRESHOLD) {
                if (distanceX > 0) onSwipeRight() else onSwipeLeft()
                return true
            }
            return false
        }
    }

    init {
        gestureDetector = GestureDetector(context, GestureListener())
    }
}
위 클래스를 실제 View에 적용하는 코드의 예는 다음과 같습니다.
llListScroll.setOnTouchListener(object: OnSwipeTouchListener(context) {
    override fun onSwipeLeft() { btnNext.performClick() }
    override fun onSwipeRight() { btnPrevious.performClick() }
})
실제 위의 코드는 모바일 기반의 GIS 솔루션인 Mobile NexGen에 반영된 코드인데요. 위의 코드와 연관된 기능에 대한 시연 영상은 아래와 같습니다.
코루틴은 스레드와 기능적으로 같지만, 스레드에 비교하면 좀더 가볍고 유연하며 한단계 더 진화된 병렬 프로그래밍을 위한 기술입니다. 하나의 스레드 내에서 여러개의 코루틴이 실행되는 개념인데, 아래의 코드는 동일한 기능을 스레드와 코루틴으로 각각 구현한 코드의 예시입니다.
Thread(Runnable {
    for(i in 1..10) {
        Thread.sleep(1000L)
        print("I'm working in Thread.")
    }
}).start()

GlobalScope.launch() {
    repeat(10) {
        delay(1000L)
        print("I'm working in Coroutine.")
    }
}
아래는 코루틴에 대해서 초점을 맞춰서 가장 간단한 코루틴의 예제입니다.
print("Start Main Thread")

GlobalScope.launch {
    delay(3000)
    print("in Coroutine ...")
}

print("End Main Thread")
코루틴은 GlobalScope.launch로 정의되며 { .. } 으로 묶은 코드가 비동기적으로 실행됩니다. 실행 결과는 다음과 같습니다.
V: Start Main Thread
V: End Main Thread
V: in Coroutine ...
다음은 비동기적으로 실행된 코루틴이 완료되어 그 결과를 반환받는 예제입니다.
GlobalScope.launch {
    launch {
        print("At Here!")
    }

    val value: Int = async {
        var total = 0
        for (i in 1..10) total += i
        total
    }.await()

    print("$value")
}
결과는 다음과 같습니다.
V: At Here!
V: 55
다음 코드 역시 비동기적으로 실행된 코루틴의 완료를 기다리고 그 결과를 반환받아 출력하는 예제입니다.
GlobalScope.launch {
    val x = doSomething()
    print("done something, $x")
}

private suspend fun doSomething():Int {
    val value: Int = GlobalScope.async(Dispatchers.IO) {
        var total = 0
        for (i in 1..10) total += i
        print("do something in a suspend method: $total")
        total
    }.await()

    return value
}
비동기적으로 실행되는 코루틴을 별도의 함수로 분리했는데, 코루틴 내부에서 실행되는 함수는 suspend로 지정해야 합니다. 위의 코드의 결과는 다음과 같습니다.
V: do something in a suspend method: 55
V: done something, 55
이번에는 2개의 코루틴을 실행하고 이 2개의 결과를 받아 출력하는 예제입니다.
print("Start...")
GlobalScope.launch(Dispatchers.Main) {
    val job1 = async(Dispatchers.IO) {
        var total = 0
        for (i in 1..10) {
            total += i
            delay(100)
        }
        print("job1")
        total
    }

    val job2 = async(Dispatchers.Main) {
        var total = 0
        for (i in 1..10) {
            delay(100)
            total += i
        }
        print("job2")
        total
    }

    val result1 = job1.await()
    val result2 = job2.await()

    print("results are $result1 and $result2")
}
print("End.")
위의 코드에서 볼 수 있는 Dispatchers.Main, Dispatchers.IO는 각각 UI 변경 등을 처리하는 메인 스레드 그리고 입출력 연산을 처리하기에 적합한 IO 스레드를 의미하며, 코루틴들은 이처럼 지정된 스레드 내에서 실행됩니다. 위 코드의 결과는 다음과 같습니다.
V: Start...
V: End.
V: job1
V: job2
V: results are 55 and 55
다음은 코루틴이 완료를 기다리기 위한 await 호출을 사용하지 않는 또다른 방법입니다.
GlobalScope.launch(Dispatchers.IO) {
    val v = withContext(Dispatchers.Main) {
        var total = 0
        for (i in 1..10) {
            delay(100)
            total += i
        }

        total
    }

    print("result: $v")
    print("Do something in IO thread")
}
withContext를 써서 새로운 코루틴을 다른 스레드에서 동기적으로 실행하도록 하는 코드입니다. 결과는 다음과 같습니다.
V: result: 55
V: Do something in IO thread
launch는 Job 객체를 반환하는데, 이를 통해 다음 예제처럼 코루틴을 중간에 중단시킬 수 있습니다.
print("start..")

val job = GlobalScope.launch() {
    repeat(10) {
        delay(1000L)
        print("I'm working.")
    }
}

runBlocking {
    delay(3000L)
    job.cancel()
}

print("stop")
실행 결과는 다음과 같습니다.
V: start..
V: I'm working.
V: I'm working.
V: stop
이번에는 Job 객체를 통해 코루틴이 완전이 종료될때까지 기다리는 예제입니다.
print("start..")

val job = GlobalScope.launch() {
    repeat(10) {
        delay(1000L)
        print("I'm working.")
    }
}

runBlocking {
    job.join()
}

print("stop")
결과는 다음과 같습니다.
V: start..
V: I'm working.
V: I'm working.
V: I'm working.
V: I'm working.
V: I'm working.
V: I'm working.
V: I'm working.
V: I'm working.
V: I'm working.
V: I'm working.
V: stop
코루틴은 정해진 시간이 되면 코루틴의 완료되지 못할지라도 중지하게 할 수 있는데, 아래의 코드가 바로 그 예입니다.
print("start")

val job = GlobalScope.launch {
    withTimeout(4000L) {
        repeat(10) {
            delay(1000L)
            print("I'm working.")
        }
    }
}

print("end")
결과는 다음과 같습니다.
V: start
V: end
V: I'm working.
V: I'm working.
V: I'm working.
코루틴은 채널(Channel)이라는 개념을 통해 코루틴에서 생성한 데이터를 또 다른 코루틴에게 전달할 수 있습니다. 아래의 코드는 코루틴에서 1~5까지의 정수에 대한 제곱값을 생성하면 생성된 정수 4개를 또 다른 코루틴에서 받아 출력하는 예입니다.
runBlocking {
    print("start")

    val channel = Channel<Int>()

    launch {
        for (x in 1..5) {
            channel.send(x * x)
        }
    }

    repeat(5) {
        val v = channel.receive()
        print("$v")
    }

    print("end")
}
결과는 다음과 같습니다.
V: start
V: 1
V: 4
V: 9
V: 16
V: 25
V: end
데이터를 생성하는 쪽이나 받는 쪽에서는 얼마나 많은 데이터를 생성할지 또는 받을지를 예측할 수 없는 경우가 대부분입니다. 데이터를 생성하는 쪽에서 채널의 close 함수를 호출하면 받는쪽에서 더 이상 데이터가 없다는 것을 인지하게 되는데, 아래는 이에 대한 코드 예입니다.
runBlocking {
    print("start")

    val channel = Channel<Int>()

    launch {
        for(x in 1..5) channel.send(x*x)
        channel.close()
    }

    for(y in channel) print("$y")

    print("end")
}
결과는 다음과 같습니다.
V: start
V: 1
V: 4
V: 9
V: 16
V: 25
V: end
다음은 데이터를 생성하는 코루틴을 함수화하여 이 함수를 통해 생성된 데이터를 처리하는 예제입니다.
runBlocking {
    print("start")

    val squares = procedureSquares()
    squares.consumeEach {
        print("$it")
    }

    print("end")
}

private fun CoroutineScope.procedureSquares(): ReceiveChannel<Int> = produce {
    for(x in 1..5) send(x*x)
}
결과는 다음과 같습니다.
V: start
V: 1
V: 4
V: 9
V: 16
V: 25
V: end
다음은 데이터를 생성하는 코루틴을 파이프라인 형태로 묶어 처리하는 것으로, 첫번째 코루틴에서 생성한 값을 또 다른 코루틴에서 받아 처리하여 또 다른 코루틴으로 전달하는 예제입니다.
runBlocking {
    print("start")

    val numbers = productNumbers()
    val squares = squares(numbers)

    for(i in 1..5) print("${squares.receive()}")

    print("end")

    coroutineContext.cancelChildren()
}

private fun CoroutineScope.productNumbers() = produce<Int> {
    var x = 1
    while(true) {
        print("send ${x} on productNumbers")
        send(x++)
        delay(100)
    }
}

private fun CoroutineScope.squares(numbers:ReceiveChannel<Int>): ReceiveChannel<Int> = produce {
    for(x in numbers) {
        print("send ${x} on squares")
        send(x*x)
    }
}
결과는 다음과 같습니다.
V: start
V: send 1 on productNumbers
V: send 1 on squares
V: 1
V: send 2 on productNumbers
V: send 2 on squares
V: 4
V: send 3 on productNumbers
V: send 3 on squares
V: 9
V: send 4 on productNumbers
V: send 4 on squares
V: 16
V: send 5 on productNumbers
V: send 5 on squares
V: 25
V: end
데이터를 생성하는 코루틴은 1개지만, 이를 원활하게 처리하기 위해 여러개의 코루틴으로 생성된 데이터를 처리할 수 있습니다. 아래는 데이터를 생성하는 코루틴 1개와 생성된 데이터를 처리하는 5개의 코루틴에 대한 예제입니다.
runBlocking {
    val producer = productNumbers()
    repeat(5) {
        launchProcessor(it, producer)

    }

    delay(1000L)
    producer.cancel()
}

fun CoroutineScope.launchProcessor(id:Int, channel: ReceiveChannel<Int>) {
    launch {
        for(msg in channel) {
            print("Processor #$id received $msg")
        }
    }
}

private fun CoroutineScope.productNumbers() = produce<Int> {
    var x = 1
    while(true) {
        print("send ${x} on productNumbers")
        send(x++)
        delay(100)
    }
}
결과는 다음과 같습니다.
V: send 1 on productNumbers
V: Processor #0 received 1
V: send 2 on productNumbers
V: Processor #0 received 2
V: send 3 on productNumbers
V: Processor #1 received 3
V: send 4 on productNumbers
V: Processor #2 received 4
V: send 5 on productNumbers
V: Processor #3 received 5
V: send 6 on productNumbers
V: Processor #4 received 6
V: send 7 on productNumbers
V: Processor #0 received 7
V: send 8 on productNumbers
V: Processor #1 received 8
V: send 9 on productNumbers
V: Processor #2 received 9
V: send 10 on productNumbers
V: Processor #3 received 10
반대로 데이터를 생성하는 코루틴은 여러개이고 처리하는 코루틴은 1개인 경우도 있습니다. 아래는 데이터를 생성하는 코루틴 2개와 생성된 데이터를 처리하는 코루틴 1개에 대한 예제입니다.
runBlocking {
    val channel = Channel<String>()
    launch {
        sendString(channel, "foo", 200L)
    }

    launch {
        sendString(channel, "BAR", 500L)
    }

    repeat(6) {
        print("${channel.receive()}")
    }

    coroutineContext.cancelChildren()
}

private suspend fun sendString(channel: SendChannel<String>, s:String, time:Long) {
    while(true) {
        delay(time)
        channel.send(s)
    }
}
결과는 다음과 같습니다.
V: foo
V: foo
V: BAR
V: foo
V: foo
V: BAR
아래의 예제는 2개의 코루틴에서 하나의 데이터에 대해 어떤 처리를 해서 주고 받는 기능에 대한 코드입니다.
print("start")
data class Ball(var hits:Int)

suspend fun player(name:String, table: Channel) {
    for(ball in table) {
        ball.hits++
        print("$name $ball")
        delay(300)
        table.send(ball)
    }
}

runBlocking {
    var table = Channel<Ball>()

    launch {
        player("ping", table)
    }

    launch {
        player("pong", table)
    }

    table.send(Ball(0))
    delay(1000)
    coroutineContext.cancelChildren()
}
print("end")
결과는 다음과 같습니다.
V: start
V: ping Ball(hits=1)
V: pong Ball(hits=2)
V: ping Ball(hits=3)
V: pong Ball(hits=4)
V: end
안드로이드에서 하나의 뷰에 대한 특정 속성값을 애니메이션화하기 위한 API인 ViewPropertyAnimator에 대한 내용입니다. 먼저 아래와 같은 레이아웃에 애니메이션을 위한 버튼 뷰를 하나 배치합니다.
<?xml version="1.0" encoding="utf-8"?>
<ScrollView xmlns:android="http://schemas.android.com/apk/res/android"
    android:layout_width="match_parent"
    android:layout_height="match_parent"
    android:orientation="vertical"
    android:scrollbars="none">

    <Button
        android:id="@+id/myView"
        android:layout_width="80dp"
        android:layout_height="80dp"
        android:layout_marginTop="8dp"
        android:layout_marginBottom="8dp"
        android:text="Hello" />

</ScrollView>
이제 버튼을 터치할때 애니매이션이 시작될 수 있도록 다음 코드를 추가합니다.
myView.setOnClickListener {
    myView
        .animate()
        .scaleX(5.0f)
        .scaleY(5.0f)
        .alpha(0.0f)
        .translationX(400.0f)
        .translationY(400.0f)
        .rotation(360.0f)
        .setDuration(1000)
        .withStartAction {
            Toast.makeText(this, "애니메이션 시작", Toast.LENGTH_SHORT).show()
        }
        .withEndAction {
            myView.scaleX = 1.0f;
            myView.scaleY = 1.0f;
            myView.alpha = 1.0f;
            myView.x = 0.0f;
            myView.y = 0.0f;
            myView.rotation = 0.0f;
            Toast.makeText(this, "완료", Toast.LENGTH_SHORT).show()
        }.start()
}
참고로 언어는 코들린입니다. 1초간 뷰의 크기를 5배로, 점점 투명하게, X와 Y의 위치를 각각 400과 400으로, z축으로 360회전 하도록 하는애니메이션입니다. 그 결과는 아래와 같습니다.