이 글의 원문은 https://opencv-python-tutroals.readthedocs.io/en/latest/py_tutorials/py_imgproc/py_template_matching/py_template_matching.html#template-matching 입니다.
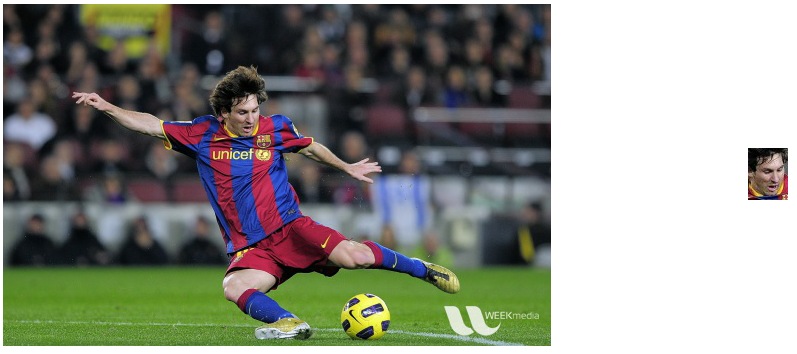
템플릿 매칭이란 어떤 큰 이미지에 존재하는 다른 작은 조각 이미지(템플릿 이미지)가 어디에 존재하는지를 찾아 내는 것입니다. 예를들어 아래의 이미지 중 왼쪽 이미지에서 오른쪽의 조각 이미지를 찾아내는 것을 말합니다.
위의 입력 이미지를 활용하여 템플릿 매칭에 대한 OpenCV 예제를 살펴보면..
import cv2
import numpy as np
from matplotlib import pyplot as plt
img = cv2.imread('./data/messi5.jpg',0)
img2 = img.copy()
template = cv2.imread('./data/messi_face.jpg',0)
w, h = template.shape[::-1]
# All the 6 methods for comparison in a list
methods = ['cv2.TM_CCOEFF', 'cv2.TM_CCOEFF_NORMED', 'cv2.TM_CCORR',
'cv2.TM_CCORR_NORMED', 'cv2.TM_SQDIFF', 'cv2.TM_SQDIFF_NORMED']
for meth in methods:
img = img2.copy()
method = eval(meth)
# Apply template Matching
res = cv2.matchTemplate(img,template,method)
min_val, max_val, min_loc, max_loc = cv2.minMaxLoc(res)
# If the method is TM_SQDIFF or TM_SQDIFF_NORMED, take minimum
if method in [cv2.TM_SQDIFF, cv2.TM_SQDIFF_NORMED]:
top_left = min_loc
else:
top_left = max_loc
bottom_right = (top_left[0] + w, top_left[1] + h)
cv2.rectangle(img,top_left, bottom_right, 255, 2)
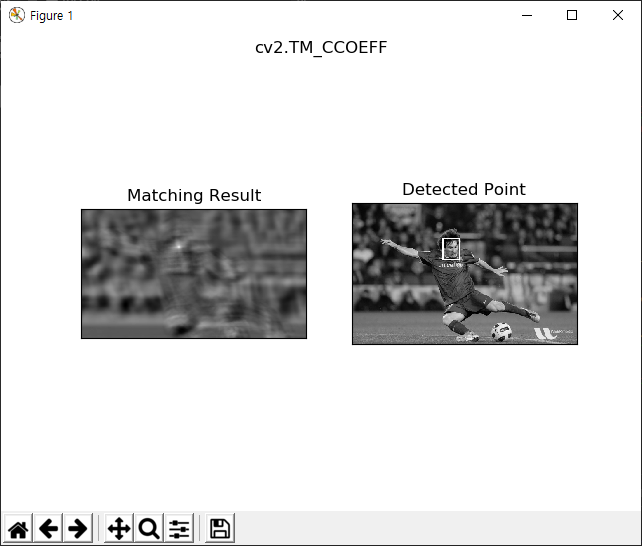
plt.subplot(121),plt.imshow(res,cmap = 'gray')
plt.title('Matching Result'), plt.xticks([]), plt.yticks([])
plt.subplot(122),plt.imshow(img,cmap = 'gray')
plt.title('Detected Point'), plt.xticks([]), plt.yticks([])
plt.suptitle(meth)
plt.show()
OpenCV에서 제공하는 템플릿 매칭에 대한 함수는 cv2.matchTemplate입니다. 총 6가지 종류의 탬플릿 매칭 알고리즘을 제공하는데 11번 코드의 배열에 언급되어 있습니다. 총 6개의 결과가 표시되는데 이해를 돕기 위해 하나만 언급하면 다음과 같습니다.
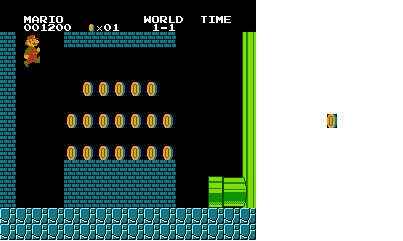
위의 예제는 단 하나의 매칭 결과만을 반환하는데, 만약 이미지에 동일한 템플릿 이미지가 여러개 존재할 경우에 대한 예제를 살펴보겠습니다. 먼저 입력 이미지인데요. 아래의 왼쪽 이미지에서 오른쪽의 조각 이미지를 찾아내고자 합니다.
코드는 다음과 같습니다.
import cv2
import numpy as np
from matplotlib import pyplot as plt

img_rgb = cv2.imread('./data/mario.png')
img_gray = cv2.cvtColor(img_rgb, cv2.COLOR_BGR2GRAY)
template = cv2.imread('./data/coin.png',0)
w, h = template.shape[::-1]

res = cv2.matchTemplate(img_gray,template,cv2.TM_CCOEFF_NORMED)
threshold = 0.8
loc = np.where(res >= threshold)
for pt in zip(*loc[::-1]):
    cv2.rectangle(img_rgb, pt, (pt[0] + w, pt[1] + h), (0,0,255), 2)

cv2.imshow('result', img_rgb)
cv2.waitKey()
cv2.destroyAllWindows()
결과는 다음과 같습니다.
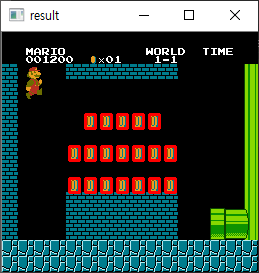
일치하는 것을 1개만 찾을때는 최대, 최소값에 기반하지만 여러개를 찾을 경우에는 임계치 조건(위의 예제의 경우 0.8)을 사용하여 임계치 값보다 큰 모든 매칭 영역을 표시하고 있습니다.